352-753-4040
Support@TheVillages.net
The Villages Links
- Airport Shuttle
- Careers in The Villages
- Citizens First Bank
- Community Development Districts
- Country Club Enhancements & Executive Trail Pass
- GolfTheVillages.com
- The Villages Polo Club
- The Villages® App
- The Villages Entertainment
- The Villages Health
- The Waterfront Inn
- The Brownwood Hotel and Spa
- Hotel Eastport
News Links
Technology
- 'A surprising number of them said, “Yes.”': Study finds many customers would leave a business which stays loyal to US big tech services
- Ukrainian hackers breach 'rudimentary' Russian combat control system controlled by Telegram groups
- I test ANC headphones for a living, and these are the only 3 pairs I'd recommend on Prime Day — irrespective of the deals on offer
- How to watch Jordan vs Algeria: Free Streams & TV Channels for FIFA World Cup 2026
- A server within a server: HP packs 81,920 CPU cores, up to 1.28PB RAM into one 42U rack using 80 multi-node motherboards — unannounced Venice is likely to be the fastest x86 CPU ever produced
Sports
iPad - iPhone Setup
Step 1
On the iPad/iPhone go to the Home screen and open Settings.
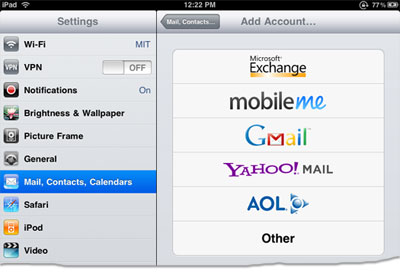
Open Mail, Contacts, Calendars.
Step 2
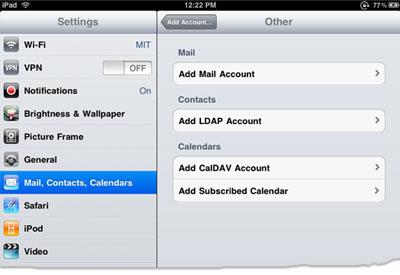
Open Add Account then select Other.
Select Add Mail Account.
Step 3
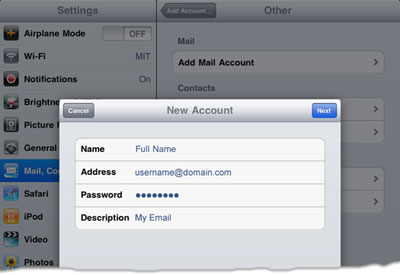
In the New Account screen, enter the following information:
- Name: Your Name
- Address: Your full email address.
- Password: Your password.
- Description: You may change this description to whatever you prefer; for example, "Work Email"
Select Next.
Step 4
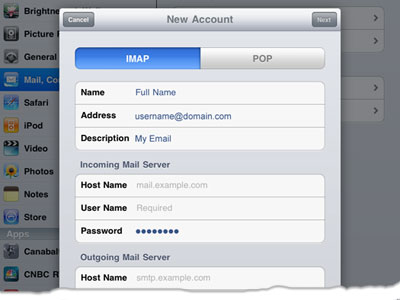
In this screen, make sure that the server type selected at the top is IMAP, rather than POP, and that the name and address are listed properly.
Step 5

Under Incoming Mail Server, please enter the following information:
- HostName: mail.thevillages.net
- UserName: Your full email address (username@thevillages.net).
- Password: Your password.
Under Outgoing Mail Server, enter:
- HostName: mail.thevillages.net
- UserName: Your full email address (username@thevillages.net).
- Password: Your password.
Note that the User Name and Password fields in Outgoing Mail Server are required even though it says "Optional" on the iPad.
When you click Next, the iPad will attempt to connect to the server, and will fail with an error message: "Cannot connect using SSL. Do you want to try setting up the account without SSL?"
Click Yes or Cancel
Step 6
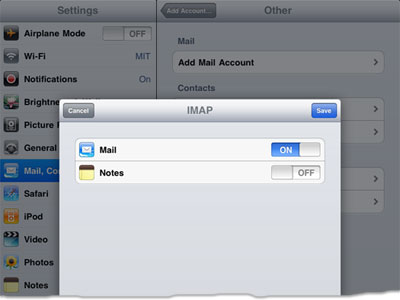
Select the Next button at the the top of the screen.
With the Mail switch turned ON, press the Save button at the top of the screen.
You may also enable Notes. Doing so will sync your iPads notes with the notes folder in your email account.
Step 7
- Open up your TheVillages.net Account
- Tap on your email address
- Go down to "Outgoing Mail Server"
- Tap on "mail.thevillages.net"
- You will see mail.thevillages.net under "Primary Server"
- Tap on "On"
Settings should be as follows:
- Host name: mail.thevillages.net
- Username: Your usernam
- Password: Your password
- Use SSL has to be "On"
- Authentication: "Password"
- Server Port: 465
- Click "Done"
Once it is verified your email is now setup and ready to use.